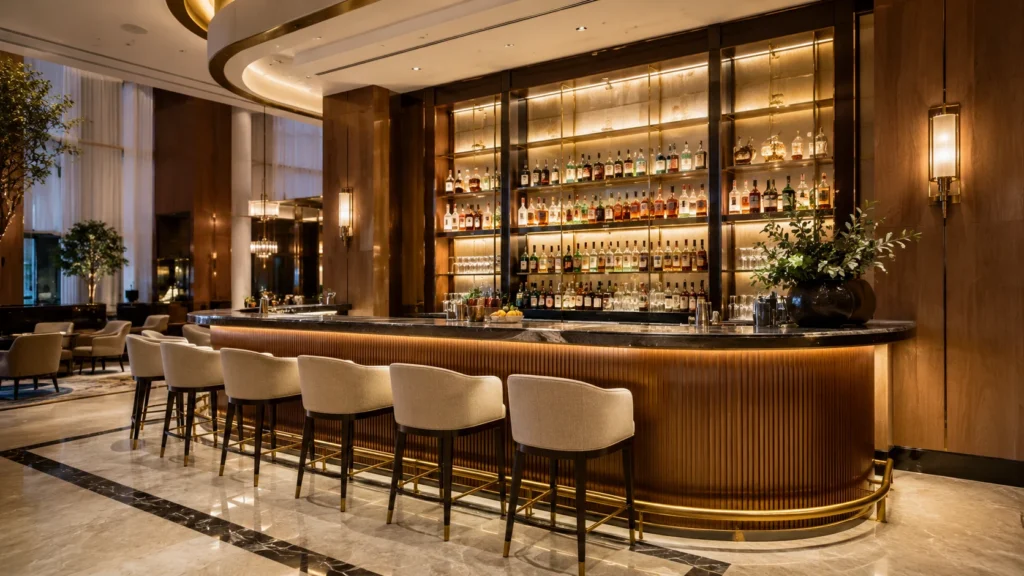
A hotel bar may look simple from the guest side, but behind the counter it is a coordinated technical system. Good bar counter design must balance appearance with daily operations, including dimensions, stools, equipment, plumbing, lighting, storage, and maintenance.
This coordination matters even more in hotels, where one bar may support several service periods or adjacent F&B spaces. A lobby bar may serve coffee during the day and cocktails at night, while a restaurant bar may also support table service. Rooftop and resort bars may add moisture, heat, and heavier environmental exposure.
For that reason, the millwork should not be finalized before equipment and building services are coordinated. This guide explains how to plan a buildable hotel or restaurant bar, covering dimensions, front bars, underbars, back bars, equipment, plumbing, electrical services, lighting, materials, accessibility, and shop drawings.
Bar Counter Dimensions: Quick Reference
Dimensions are a useful starting point for any bar counter design, but they are not universal standards. The final size depends on the bar concept, stools, equipment, service model, accessibility requirements, and site conditions.
Use the following ranges for early hotel and restaurant bar planning. Final equipment openings and service clearances should always follow the selected equipment cut sheets.
| Dimension | Typical Planning Range |
|---|---|
| Bar Top Height | About 40–42 in. (102–107 cm) |
| Bar Stool Seat Height | About 28–30 in. (71–76 cm) |
| Seat-to-Bar Top Distance | About 10–12 in. (25–30 cm) |
| Bar Top Depth | About 18–24 in. (46–61 cm) |
| Guest-Side Overhang | About 10–12 in. (25–30 cm) |
| Bar Seating Width per Guest | About 24–30 in. (61–76 cm) |
| Bartender Work Surface Height | About 34–36 in. (86–91 cm) |
| Underbar Equipment Depth | Often about 24–30 in. (61–76 cm) |
| Bartender Aisle Width | Often about 36–48 in. (91–122 cm) |
| Back Bar Depth | Often about 18–24 in. (46–61 cm) |
| Circulation Behind Seated Guests | Often about 36–48+ in. (91–122+ cm), depending on traffic |
| Footrest Height | Often about 7–9 in. (18–23 cm) above the floor |
Bar Counter Height, Depth and Stool Dimensions
The main guest-side dimensions in bar counter design should be planned as a group. Bar height, stool height, countertop depth, overhang, and seating width all affect comfort.
Bar Counter Height and Bar Stool Height
Guest-facing bar tops are commonly planned at about 40–42 in. (102–107 cm) high. Bar stools are often around 28–30 in. (71–76 cm) at the seat.
These dimensions should be selected together rather than treated as separate standards. A stool that sits too low can make the counter uncomfortable, while an oversized seat may affect legroom and circulation.
For hotel bars, select the stool early enough to check seat height, upholstery compression, arm height, swivel movement, and footrest position.
Seat-to-Bar Top Distance
A useful planning relationship is about 10–12 in. (25–30 cm) between the stool seat and the top of the bar.
This vertical distance helps create comfortable space for the guest’s upper legs and sitting posture. Too little can feel cramped, while too much can leave the guest sitting unusually low relative to the counter.
This relationship is a useful bar counter design check because stool height and bar height should not be selected in isolation.
Bar Counter Depth and Guest-Side Overhang
A guest-facing bar top is often planned at about 18–24 in. (46–61 cm) deep. The final depth depends on the service model and how guests use the counter.
A cocktail lounge may need less dining surface area than a hotel restaurant bar that serves food. Guest-side overhang also affects comfort. About 10–12 in. (25–30 cm) is a useful early planning range for seated positions.
Overhang must also work with the countertop material and support structure. Heavy stone or long cantilevers may require additional reinforcement. Check these elements together:
- Bar top depth
- Guest-side overhang
- Countertop thickness
- Knee space
- Structural support
- Bartender workspace
Bar Seating Width and Stool Spacing
Allow about 24–30 in. (61–76 cm) of bar length per seated guest as an early planning range.
Bar seating width is another bar counter design decision that depends on the stool design. Wide upholstered stools, armrests, and swivel movement usually need more space than compact armless stools.
Also check how guests sit down, stand up, and move behind the stools. For premium hotel bars, slightly more personal space can feel better than maximizing every possible seat.
Bartender Aisle, Underbar and Back Bar Dimensions
The guest side is only half of a complete bar counter design. Behind the counter, dimensions directly affect bartender movement, equipment access, storage, and service efficiency.
Bartender Aisle Width
A working aisle of about 36–48 in. (91–122 cm) is a useful early planning range for many commercial bars.
The final width depends on staffing, equipment, and workflow. Check whether bartenders need to pass each other, whether refrigerator doors open into the aisle, whether drawers project into the workspace, and whether several stations share the same route.
More space is not always better. An oversized aisle can increase repeated walking between the front and back bar.
Think of the workstation like a cockpit. Frequently used equipment should remain within efficient reach.
Underbar Equipment Depth
Undercounter refrigerators, sinks, ice bins, storage, and glasswashers can require significant depth.
An early equipment envelope of about 24–30 in. (61–76 cm) is useful for planning, but actual equipment dimensions must control the final millwork. Commercial underbar systems are available in different depths and configurations, so there is no single universal equipment depth.
A refrigerator may fit within the cabinet while its handle, ventilation space, pipes, or electrical connection do not.
Confirm the selected equipment model and cut sheet before production.
Back Bar Depth
Back bars vary widely because their functions vary.
A shallow bottle display needs less space than a back bar containing refrigeration, coffee equipment, or deep storage.
Around 18–24 in. (46–61 cm) can be used as an early planning range for many storage and display applications. The actual depth should follow what the back bar needs to contain.
Before finalizing the depth, ask:
What actually needs to fit inside the back bar?
Consider bottles, glassware, shelving, refrigeration, coffee equipment, wiring, lighting, and maintenance access.
Circulation Behind Seated Guests
Circulation is an important part of bar counter design because an occupied stool uses more space than its physical footprint. The occupied seating zone also includes the guest and the space needed to sit down or stand up.
For early planning, 36–48+ in. (91–122+ cm) can be used as a working range behind occupied seating, depending on traffic and how the distance is measured. Busy hotel restaurant bars may require more space for servers and guests to pass comfortably.
Do not treat 36 inches as a universal bar clearance. Where the route also forms part of an accessible route, applicable accessibility requirements must be checked separately. Under the ADA Accessible Routes requirements, accessible walking surfaces generally require a continuous clear width of at least 36 inches, with additional clearance required in some turning conditions.
Understand the Hotel Bar Before Designing the Counter
Good bar counter design starts with operations, not finishes, especially in hotel projects. Before choosing stone, metal, or decorative details, define how the bar will serve guests and how staff will work behind it.
Define the Service Model
Different hotel bars serve different functions. A lobby bar may offer coffee, snacks, wine, and cocktails throughout the day, while a hotel restaurant bar may support both seated guests and table service.
A cocktail lounge may prioritize bartender performance and atmosphere. A rooftop or pool bar may need materials suited to moisture, heat, and environmental exposure.
Before developing the layout, define:
- Beverage program
- Food service
- Operating periods
- Expected service volume
- Staffing
- Storage requirements
- Refrigeration needs
- Table-service requirements
The operating model should shape the bar counter design, including its layout, equipment, storage, and finishes.
Estimate Service Volume and Staffing
A compact workstation may work well for one bartender. The same layout can become a bottleneck when several bartenders share one ice bin, sink, or service point.
Peak staffing and service volume should be considered early in the bar counter design process, before the underbar layout is finalized. Larger hotel bars may benefit from repeated workstations rather than one long equipment run.
This can reduce unnecessary movement and keep frequently used equipment closer to each bartender.
Map Guest and Bartender Flow
Before finalizing the bar counter design, map both guest and bartender movement to identify unnecessary travel, crossing points, and service bottlenecks.
The goal is not to create a perfectly linear path, but to keep frequently repeated movements short and reduce conflicts between guests, servers, and bartenders.
Front Bar, Underbar and Back Bar: How the System Works
A complete hotel bar counter design should coordinate three connected zones: the front bar, underbar, and back bar. Each has a different role, but all three should be coordinated as one system.
- Bar top
- Decorative counter front
- Guest-side overhang
- Footrest
- Bar stools
- Accessible dining positions
- Integrated decorative lighting
- Work surfaces
- Sinks
- Ice bins
- Speed rails
- Refrigeration
- Glasswashers
- Drawers and storage
- Waste bins
- POS equipment
- Bottle shelving
- Glass racks
- Mirrors
- Refrigeration
- Wine storage
- Coffee equipment
- Decorative panels
- Integrated lighting

Plan Bartender Work Zones Before Finalizing the Millwork
Effective bar counter design should organize the underbar around the drink-making process rather than treat it as a simple line of cabinets. Group equipment by task so bartenders can prepare, serve, wash, and restock with less unnecessary movement.
Keep frequently used ingredients and tools within easy reach to reduce repeated movement during peak service.
Separate dirty-glass handling, washing, drainage, and clean storage to reduce congestion and workflow conflicts.
Position cold storage and beverage equipment according to service frequency and the requirements of different dayparts.
Keep ordering, payment, and server pickup points clear of heavy washing and drink-preparation traffic.

Coordinate Bar Equipment Before Designing the Millwork
Equipment selection is a critical part of bar counter design and should happen before the millwork is fully detailed. Even small differences in size, ventilation, plumbing, or door movement can affect cabinets, countertops, and building services.
| Equipment Group | Typical Items | Main Coordination |
|---|---|---|
| Wet Equipment | Sinks, glasswashers, ice equipment | Water, drainage, cutouts |
| Refrigeration | Undercounter refrigerators, wine coolers | Depth, ventilation, door swing |
| Beverage Equipment | Coffee equipment, beer systems, dispensers | Power, water, clearance |
| Service & Storage | POS equipment, speed rails, glass racks | Reach, wiring, fixing |
Confirm Equipment Models and Cut Sheets
Avoid designing around a generic note such as “undercounter refrigerator.” Two units with the same nominal width can have different depths, ventilation needs, connections, or door configurations.
Confirm the actual model whenever possible and review:
- Overall width, height, and depth
- Ventilation requirements
- Electrical requirements
- Water supply
- Drainage
- Door and drawer movement
- Equipment weight
- Maintenance access
Equipment cut sheets should inform the bar counter design from the beginning rather than being collected after the cabinetry is finished.
Check Cutouts, Clearances and Equipment Removal
Built-in equipment needs more than a cavity that matches its nominal dimensions.
Sinks require accurate countertop cutouts. Refrigerators may need ventilation gaps. Doors and drawers need room to open without blocking the bartender aisle.
Also consider future replacement. Equipment should have a practical route out of the millwork without removing finished stone or surrounding cabinetry.
Resolve these interfaces before the bar counter design is released for countertop and cabinet production.
Check Structural Support
Structural support is an important part of bar counter design because bar equipment and finishes can create significant loads. Stone countertops, sinks, refrigeration, and suspended back-bar shelves may all require additional support.
Depending on the design, support may come from cabinet framing, steel reinforcement, brackets, or engineered structures.
Show critical support requirements in the shop drawings rather than leaving them for the installation team to solve on site.
Bar Plumbing and Drainage Design
Plumbing is a critical technical part of bar counter design because a simple-looking bar may conceal a complex fit-out package. Hotel bars may combine sinks, ice equipment, glasswashing equipment, coffee machines, and beverage systems within a compact millwork zone.
For U.S. food-service projects, the FDA Food Code provides a model framework for food safety. Adoption and enforcement vary by jurisdiction.
Which Bar Equipment Needs Water?
Water requirements depend on the beverage program and selected equipment. Connections may be needed for handwashing sinks, prep sinks, glasswashers, glass rinsers, ice machines, coffee equipment, and beverage systems.
The FDA Food Code requires at least one handwashing sink and enough sinks for convenient employee use in the required areas. It also requires handwashing sinks to be located for convenient use in food preparation, dispensing, and warewashing areas.
The exact requirement still depends on the project layout and local authority. Confirm equipment and regulatory requirements before fixing water points inside the bar.
Plan Drainage Before Fabrication
Good bar counter design must plan not only how water enters the bar, but also how it drains safely and efficiently. Review sink waste, glasswasher discharge, ice melt, equipment drains, drip trays, and condensate before fabrication.
The FDA Food Code requires sinks and drainboards associated with warewashing sinks and machines to be self-draining. It also addresses drainage for equipment compartments that can collect moisture.
Ice equipment needs particular attention. FDA Food Code §4-204.17 states that liquid waste drain lines cannot pass through an ice machine or ice storage bin.
Drain locations should therefore be coordinated with equipment cut sheets, cabinet divisions, and access requirements before production.
Plan How Plumbing Enters the Bar
Confirm where water supply and waste services enter the bar.
Reserve space for pipe routes, fittings, and service clearances.
Coordinate service points with selected equipment and cut sheets.
Keep waste lines, traps, and shutoff valves practical to install and service.
Keep key connections reachable after the bar is fully installed.
Protect Millwork Around Wet Areas
Wet-area bar counter design requires careful detailing where water and wood-based millwork meet. Wet areas may need moisture-resistant substrates, sealed edges, protected penetrations, or metal lining where appropriate.
Pay particular attention around sinks, ice equipment, and plumbing penetrations. Joints between stone, solid surface, metal, and cabinetry should also resist repeated moisture exposure.
The goal is simple: keep water where it belongs and protect the surrounding finishes.
Provide Plumbing Maintenance Access
Plumbing connections will eventually need inspection or repair. Keep valves, traps, filters, shutoffs, and important connections accessible.
FDA Food Code §5-204.12 requires backflow prevention devices to be located so they can be serviced and maintained. Separately, §5-205.15 requires plumbing systems to be maintained in good repair.
Good bar counter design keeps essential service components accessible rather than hiding them behind permanently fixed decorative panels. Removable access panels can preserve the finished appearance while allowing future maintenance.
Electrical, Data and Power Coordination
Electrical and data coordination is an important part of a buildable bar counter design in hotel projects. Refrigeration, ice equipment, glasswashers, coffee machines, POS systems, and lighting should all be coordinated before the millwork is finalized.
Equipment Power
Prepare an equipment schedule before finalizing outlet locations. Match each unit with its actual voltage, electrical load, connection type, and access requirements.
Avoid placing outlets where installed equipment will permanently block access. Outlet locations should also be coordinated with ventilation openings, plumbing routes, and equipment removal space.
Outlets and Wet Areas
Electrical coordination needs particular attention around sinks, ice equipment, glasswashers, and other wet areas.
OSHA advises that equipment and appliances near sources of water should be properly grounded. Its electrical standards also state that conductors or equipment may not be located in damp or wet locations unless identified for use in that operating environment.
Final electrical requirements should be confirmed by qualified professionals under the codes and regulations applicable to the project.
POS, Data and Cable Routing
A coordinated bar counter design should integrate POS power, network connections, printers, chargers, and cable routes with the cabinetry.
Provide concealed cable routes and accessible connection points where practical. Otherwise, installers may need to drill finished stone or millwork after production.
Bar Counter Lighting Design
Lighting is an important part of bar counter design because it must balance the atmosphere guests experience with the visibility staff need to work safely and efficiently.
These functions should be coordinated. A visually dramatic bar can still perform poorly if bartenders cannot read labels, prepare drinks, or clean work surfaces comfortably.
Sets the overall atmosphere and supports different hotel bar dayparts.
Provides practical visibility for bartender preparation and service.
Highlights bottles, materials, shelving, and architectural details.
Ambient Lighting
Hotel bars often operate across several dayparts. A lobby bar may need a brighter daytime atmosphere and a more intimate mood in the evening.
Lighting controls and dimming can help the same space support different service periods without changing the physical design.
Task Lighting for Bartender Work Areas
Bartenders need enough visibility to read labels, prepare drinks, clean surfaces, and operate POS equipment.
Task lighting should support these activities without creating glare for seated guests. Mood lighting should not leave the working side of the bar unnecessarily dark.
Back Bar and Accent Lighting
Accent lighting can highlight bottles, shelving, materials, and architectural details. Common applications include illuminated bottle shelves, recessed shelf lighting, backlit panels, display niches, under-counter LEDs, and decorative front-bar lighting.
The goal is to create depth and visual hierarchy rather than illuminate every surface equally.
Integrate LED Channels Into the Millwork
A drawing labeled only “LED strip” does not provide enough information for fabrication.
A detailed bar counter design should coordinate LED channels with the millwork, including channel width and depth, diffuser, recess position, shelf thickness, cable exit, and adjacent materials.
The same lighting concept may require different details in wood, stone, metal, or glass.
Plan Drivers, Controls and Maintenance Access
LED drivers, controls, wiring, and dimming components need practical locations inside or near the bar.
These components may require replacement long before the millwork does, so they should remain accessible without dismantling finished panels or decorative surfaces.
A good lighting detail considers not only how the light looks, but also how it is powered, controlled, wired, and maintained.
Best Materials for Bar Counter Design
Hotel bars place demanding requirements on finishes. Guest-facing surfaces need a premium appearance, while the same materials may face spills, cleaning chemicals, impact, moisture, and heavy daily use.
For that reason, material selection in bar counter design should reflect where and how each surface will be used rather than appearance alone.
Bar Top Materials
| Material | Best Use | Main Strength | Key Consideration |
|---|---|---|---|
| Natural Stone | Premium guest-facing bar tops | Natural character and high-end appearance | Weight, staining, sealing, edge detailing |
| Engineered Stone | Guest-facing bar tops | Consistent appearance and easy coordination | Heat, edge detailing, manufacturer limitations |
| Solid Surface | Seamless or curved bar tops | Seamless fabrication and repairability | Scratching and heat exposure |
| Wood | Feature bar tops and decorative areas | Warm, tactile appearance | Moisture, staining, and maintenance |
| Stainless Steel | Intensive bartender work surfaces | Cleanability and durability | Scratches, fingerprints, industrial appearance |
| Porcelain / Sintered Surface | Guest-facing bar tops | Stain and heat resistance | Edge fabrication, impact, handling |
The final selection should also consider fabrication capability, edge profiles, joint locations, substrate requirements, and the expected level of commercial use.

Bartender Work Surface Materials
Material selection in a bar counter design should reflect the different priorities of the bartender side and the guest-facing counter. Cleanability, moisture resistance, durability, and ease of maintenance usually matter more than decorative effect.
Stainless steel works well in many intensive wet and preparation zones. Solid surface can also be useful where seamless joints, integrated details, or easier repair are important.
Material selection should also account for sinks, equipment cutouts, drainage, and repeated exposure to liquids.
Bar Front Materials
The decorative bar front allows more design freedom. Common finishes include wood veneer, solid wood, metal, stone, tile, and architectural panels.
However, the lower portion of the front deserves special attention. Shoes, stools, luggage, mops, and cleaning equipment may repeatedly contact this area.
Durable kick zones, protected edges, and maintainable finishes can help preserve the appearance of a hotel bar over time.
Back Bar Materials
Back bars often combine several finishes within one composition. Wood can add warmth, glass can create visual lightness, mirrors can increase depth, and metal can provide refined detailing. Stone or other feature surfaces can create a stronger focal point.
Successful bar counter design depends not only on selecting attractive materials, but also on coordinating their joints, edges, attachment details, lighting channels, and changes in thickness.
Bar Top Edges, Joints, Overhangs and Support
Small construction details can significantly affect the appearance and buildability of a bar counter. Edge profiles, joint locations, overhangs, and structural support should be resolved as part of the bar counter design before fabrication.
Edge Profiles
The bar top edge affects appearance, guest comfort, cleaning, and durability.
Thin or sharp profiles can create a refined look, but they may be less forgiving under repeated impact. Also consider how seated guests will rest their arms against the edge.
The final profile should suit both the material and the expected level of commercial use.
Joint Locations
Long stone or solid-surface runs may require joints. Their locations should be planned as part of the overall bar composition rather than decided during installation.
Where possible, avoid awkward joints beside sinks, major cutouts, corners, or important visual focal points. Joint positions should also consider the material format and fabrication method.
Overhangs and Structural Support
Large overhangs and heavy countertop materials may require additional support. The final solution can involve cabinet framing, steel reinforcement, brackets, or engineered supports.
Support should also be coordinated with guest knee space, stools, equipment, and the appearance of the bar front.
Resolve critical support details before fabrication rather than leaving them for the installation team to solve on site.
Footrests, Bar Stools and Guest Comfort
A comfortable-looking stool does not guarantee comfortable bar seating. Guest comfort in bar counter design depends on how the stool, bar top, footrest, and surrounding circulation work together.
Coordinate bar top height with stool seat height, seat width, armrests, backrests, and swivel movement. Upholstered hotel bar stools may also need additional spacing compared with compact armless designs.
Footrests can improve comfort at high counters, but their position should also be coordinated with the decorative bar front, stool geometry, and floor-cleaning requirements.
Finally, check circulation behind occupied stools. Even a premium stool can create a poor guest experience if the seating zone leaves too little space for guests or staff to pass.
For fixed dining seating, see our Restaurant Banquette Seating Guide: Dimensions, Layout, Upholstery and Construction. For broader seating and dining furniture planning, see our Hotel Restaurant Furniture Guide.
Accessibility in Bar Counter Design
Accessibility should be integrated into the original bar counter design rather than treated as a late design adjustment. For hotel bars, the applicable requirement depends on how each part of the counter is actually used, so dining positions and service counters should not automatically be treated as having the same accessibility requirements.
Dining Surfaces and Service Counters Are Not the Same
This distinction is important in U.S. projects. ADA Section 226 covers dining and work surfaces, while sales and service counters are addressed separately under Section 227 and technically addressed under Section 904. The applicable requirement depends on how that part of the bar is actually used.
Applies to surfaces used for consuming food or drinks.
Applies to sales and service counter functions rather than dining surfaces.
Accessible Dining Positions
Where dining surfaces are provided for consuming food or drinks, ADA Section 226 requires at least 5% of the seating and standing spaces at those surfaces to comply with Section 902, with required accessible positions dispersed throughout the space or facility.
Section 902 requires a forward-approach clear floor space with compliant knee and toe clearance. The top of an accessible dining surface must be 28–34 in. (710–865 mm) above the finished floor. This does not mean every guest-facing bar top must be 34 inches high; it means compliant dining positions should be intentionally integrated where required.
Verify Applicable Local Requirements
ADA Standards apply to U.S. projects within their regulatory scope, while project requirements may also depend on jurisdiction, facility type, and the nature of the work. Hotels in other countries follow different accessibility regulations.
For that reason, confirm the project location, bar function, applicable regulations, and required accessible positions before approving final construction dimensions.
Design for Cleaning and Maintenance
Hotel bars operate in wet, busy, and high-use environments, so cleaning and maintenance should be considered during the bar counter design process rather than after installation.
Provide practical access to plumbing, refrigeration, electrical connections, lighting components, and other serviceable equipment. Avoid unnecessary dirt traps, and make sure appliances can be removed without damaging surrounding cabinetry, countertops, or decorative panels.
Cleaning access also matters around toe kicks, footrests, underbar equipment, and the back bar. Staff should be able to clean glass shelves, reach behind bottles, and maintain exposed finishes without dismantling the bar.
What Should Bar Counter Shop Drawings Show?
Concept drawings communicate the design intent, while shop drawings explain how the bar will actually be fabricated, coordinated, and installed.
For custom hotel bars, the drawing package should coordinate dimensions, materials, equipment, building services, and construction details before production begins.
Show enough views to explain the bar construction clearly. Sections are especially useful around countertops, sinks, equipment, service voids, shelving, and integrated lighting.
Confirm overall dimensions, bar heights, countertop depths, overhangs, openings, clearances, and interfaces with floors and walls.
Identify substrates, veneers, stone, metal, glass, framing, hardware, fasteners, joints, edges, and visible material transitions.
Coordinate selected equipment with openings, cutouts, ventilation, door movement, support, service connections, and removal space.
Show relevant interfaces with water, drainage, electrical services, data, LED channels, cable routes, drivers, and access panels.

Bar Counter Design Workflow: From Concept to Installation
A practical hotel bar counter design can be developed through ten coordinated steps. The exact sequence may vary by project, but equipment and building services should be resolved before final millwork detailing and fabrication.
Confirm the venue type, beverage program, service model, and intended guest experience.
Review seating, staffing, storage, service volume, and peak demand.
Position guest seating, bartender workstations, the back bar, and circulation routes.
Confirm sinks, refrigeration, ice equipment, glasswashing equipment, coffee equipment, and beverage systems.
Resolve service points, drainage, power, data, lighting, and routing requirements.
Finalize counter heights, depths, overhangs, millwork, surfaces, and key details.
Coordinate construction details, equipment interfaces, MEP requirements, and site conditions.
Verify finishes, joints, edge details, lighting integration, and workmanship where required.
Inspect dimensions, finishes, hardware, equipment openings, and critical interfaces before delivery.
Coordinate site access, anchoring, equipment interfaces, service connections, final adjustments, and inspection.
How Bar Counter Design Changes by Hotel Venue Type
Different hotel F&B venues may use similar bar dimensions, but their operational and material priorities can be very different.
| Hotel Bar Type | Main Priority | Typical Design Focus |
|---|---|---|
| Lobby Bar | Flexible all-day service | Coffee, cocktails, display, premium finishes |
| Hotel Restaurant Bar | Dining integration | Table service, guest seating, server circulation |
| Cocktail Lounge | Guest experience | Bartender workflow, lighting, premium finishes |
| Wine Bar | Storage and display | Bottle storage, refrigeration, illuminated display |
| Executive Lounge Bar | Flexible service | Compact equipment, storage, self-service support |
| Rooftop Bar | Atmosphere and environmental exposure | Lighting, weather resistance, durable materials |
| Pool / Resort Bar | Moisture and outdoor conditions | Drainage, corrosion resistance, easy maintenance |
A hotel lobby bar and a pool bar may use similar counter heights or equipment layouts, but they should not automatically share the same material or equipment specification. Venue conditions, operating model, environmental exposure, and maintenance requirements should influence the final bar counter design.
Common Bar Counter Design Mistakes
Many bar counter design problems begin before fabrication. The following mistakes can affect comfort, workflow, coordination, maintenance, and installation.
This can lead to incorrect openings, cabinet depths, ventilation clearances, and service points.
Guest comfort depends on the relationship between bar height, seat height, and stool geometry.
Staff still need usable circulation when refrigerator doors, drawers, or equipment are open.
Poor equipment placement adds unnecessary movement to every drink and can slow peak service.
Late plumbing changes can affect cabinets, flooring, equipment locations, and finished countertops.
Waste lines, traps, valves, and service connections need practical routes and future access.
Integrated lighting still requires cable routes, drivers, controls, and accessible maintenance locations.
Hotel bars face moisture, alcohol, cleaning chemicals, abrasion, and repeated impact.
Heavy surfaces and long overhangs may require reinforced cabinetry, brackets, or structural steel.
Small coordination errors become much more expensive once stone cutting and millwork production begin.
Bar Counter Design Checklist
Before releasing a hotel bar counter design for production, review the complete system and confirm that the main design, equipment, service, and fabrication interfaces have been coordinated.
What Information Does a Bar Counter Manufacturer Need for a Quote?
You do not need a complete construction package before contacting a bar counter manufacturer. Even during the early stages of bar counter design, the information already available can help define the scope and prepare a more useful quotation.
If some details are still under development, identify them clearly. The manufacturer can then separate confirmed requirements from assumptions and items that still need coordination.
Basic information that defines the commercial and delivery scope.
Drawings and references that help define the intended bar design.
Technical information that affects openings, services, and coordination.
Separate confirmed requirements from information still being developed.
Conclusion: Design the Bar Counter as One Coordinated System
Good bar counter design is about more than choosing an attractive countertop. Dimensions, bartender workflow, stools, equipment, plumbing, electrical services, lighting, materials, and maintenance all affect one another, so these elements should be coordinated before fabrication begins.
Hotel bars add another layer of complexity because they must also work with restaurant operations, lobby or lounge spaces, back-of-house routes, hotel finishes, and the wider fit-out package. Resolving these interfaces early can reduce late revisions, site conflicts, and unnecessary rework during production and installation.
VOLANT FIT-OUT supports custom front bars, underbar millwork, back bars, and related hotel furniture. Our scope can include design development, shop drawings, material coordination, manufacturing, and installation support depending on the project requirements.
Planning a hotel restaurant, lobby bar, lounge, rooftop bar, or resort F&B project? Whether you have a concept, reference images, floor plans, or detailed drawings, VOLANT FIT-OUT can help develop the bar package and move it toward production. Contact us to discuss your project requirements and request a quotation.
FAQs
What is the standard height of a bar counter?
A guest-facing bar counter is commonly about 40–42 in. (102–107 cm) high. Final height should be coordinated with stools, accessibility, and the overall bar counter design.
How deep should a bar counter be?
A guest-facing bar top is often about 18–24 in. (46–61 cm) deep. The final depth depends on service needs, overhang, countertop construction, and bartender workspace.
How much space is typically needed behind a commercial bar?
A bartender aisle of about 36–48 in. (91–122 cm) is a useful early planning range. The final width depends on staffing, equipment doors, drawers, and bartender workflow.
How much space should be allowed for each bar stool?
Allow about 24–30 in. (61–76 cm) of bar length per seated guest. Wider stools, armrests, and swivel movement may require additional spacing.
What is the best material for a commercial bar top?
There is no single best material for every bar counter design. Stone, solid surface, wood, stainless steel, and sintered surfaces should be selected according to appearance, durability, moisture exposure, and maintenance.
Does a hotel bar counter need plumbing and drainage?
It depends on the equipment. Sinks, ice machines, glasswashers, coffee equipment, and beverage systems may require water or drainage, so these services should be coordinated before fabrication.
What should bar counter shop drawings include?
Shop drawings should show dimensions, materials, construction details, equipment openings, support, and relevant MEP and lighting interfaces. Good shop drawings turn the bar counter design into buildable information.
How can a bar counter be designed for accessibility?
Accessibility depends on how the bar area functions and which regulations apply. In U.S. projects, dining surfaces and service counters have different ADA requirements, so compliant positions should be planned from the beginning of the bar counter design.